
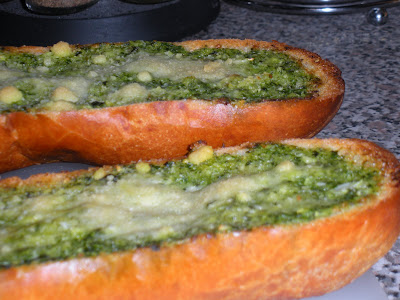
Green Garlic Bread
I totally thought of Sophia from Burp and Slurp when I made this bread. I read a while ago that she has a love for green food, which is a great and healthy color for your food to be!
Of course in this case, I can't necessarily guarantee it to be healthy, but it is dang delicious! I got the idea from Ina Garten who makes an herbed butter, which is really similar. It's very easy to throw together and open to all sorts of variations.
Green Garlic Bread
Ingredients
1 stick of butter
1 handful chopped parsley
1 handful chopped basil
2-3 scallions, roughly chopped
2-3 cloves of garlic, roughly chopped
Kosher salt
pepper
Parmesan or mozzarella cheese
1 loaf french or Italian bread, cut lengthwise
Directions
Blend butter, herbs, garlic and salt and pepper in a food processor until evenly combined.

Spread over garlic bread and sprinkle with cheese. Bake at 375 for about 10 minutes, or until cheese gets brown and bubbly and the edges of the bread are crispy.

Absolutely Fabulous Baked Beans

Hello friends! I've missed you and your delicious creations, it's amazing how a few short days puts you so behind!
We had a lovely time at the Falls, which are gorgeous. The kids did amazingly well, especially on the boat ride, which was WET! Camping is a lot of fun, but it's also nice to be home.
On to the food! I haven't always been a big fan of baked beans, I used to think that they were too soupy with a bland flavor. But when I saw Paula Deen make these, I knew I was about to become a believer.
I could seriously eat these for dessert, and I would be completely satisfied. They are sweet, tangy, crispy and smoky. They come out of the oven so thick and gooey, my mouth is watering just thinking of them! You will fill up an entire 9x13 pan, so it's great for a crowd, or half it for a family side dish.
Sue and Gloria's Baked Beans
Found from Paula Deen on Foodnetwork.com
Ingredients
4 (16-ounce) cans baked beans
1 (20-ounce) can crushed pineapple, drained
1 cup molasses
1 cup BBQ sauce
2 tablespoon yellow or brown mustard
5 slices cooked bacon, crumbled
1 (6-ounce) can french-fried onions, crushed
Salt and freshly ground black pepper
Directions
Preheat oven to 350 degrees F.
In large bowl, mix together beans, pineapple, molasses, BBQ sauce, mustard, bacon, and a third of the onions. Add some salt and pepper, to taste. Pour beans in 9 by 13-inch casserole dish and sprinkle remaining crushed onions and bacon on top. Cook in oven for 1 hour or until beans brown and bubble. Serve warm


Chipotle Black Bean Burgers

I have to thank Reeni at Cinnamon Spice and Everything Nice for posting these delicious burgers. If you haven't gone to see her yet, I can assure you, you're going to be blown away every single time. She always has such mouth watering recipes and pictures.
I loved these flavorful burgers so much, that after making them for my family, I made a double batch, froze them, and I'm already halfway through them. They are smoky, rich and oh so delicious, not to mention healthy! My favorite way to eat them is by topping them with avocado in a wheat bun, mmmm, I'm craving one now as I post! They are creamy and soft on the inside with a delicious crispy crust after being grilled.
When making these for myself, I like the chipotle pepper, it adds a good amount of heat. However, the next time I make these for my family, I'm probably going to leave the peppers out. They will still be just as good with all the other spices. If you like black beans even a little bit, you've got to try these, you won't be sorry!
Chipotle Black Bean Burgers
Created by Reeni and Cinnamon Spice and Everything Nice
Ingredients
1 can Black beans, drained and rinsed, a 1/4 cup of them set aside
1/2 cup green onion
3-4 chipotle peppers in adobo and 1-2 tablespoons of the sauce, smashed into a paste
3/4 cup shredded cheddar cheese
1 egg beaten
1/3-1/2 cup seasoned bread crumbs
1/4 cup ketchup or barbecue sauce (I did half ketchup, half barbecue, loved it)
1/2 teaspoon Chile powder
1/2 teaspoon cumin
1/2 teaspoon onion powder
1/2 teaspoon salt
1/4 teaspoon black pepper
Directions
Use either a potato masher or food processor to smash black beans. I also threw the chipotle peppers in there, just make sure to chop them coarsely, not until it's a paste.
In a large bowl combine chopped beans and peppers with remaining ingredients, including whole beans. Mix well. Form into four patties, cover in plastic wrap and chill in the fridge for 30 minutes.
Cook on George Foreman grill, or a large skillet, for about five minutes, or until outsides are crisp and cheese is melted. They are most likely too fragile to grill, but neither Reeni or I have tried it like this.
Serve on hamburger bun with desired fixins, avocado, red onion, pickles, etc. MMMmmmm!
Adobo Flank Steak with Summer Corn and Tomato Relish

This was a really fun and different way to make steak. The marinade is full of smoky flavor and the corn relish adds a freshness and sweetness that balances the dish out perfectly. I would even make the corn relish as a side dish. In my opinion this will come out the very best if you use all fresh ingredients, including fresh corn on the cob and fresh red peppers roasted yourself. Also, be aware before making this that you will want to marinade the steak overnight.
Adobo Flank Steak with Summer Corn and Tomato Relish
Slightly adapted from Cooking Light Healthy Summer Grilling
Ingredients
1 teaspoon black pepper
1 teaspoon ground cumin
1 teaspoon ground cloves
1 chipotle chile in adobo sauce
2 tablespoons red wine or sherry vinegar
1 teaspoon thyme
2 teaspoons brown sugar
3/4 teaspoon kosher salt
1 garlic clove, peeled
1 (1 1/4lb) flank steak, trimmed
RELISH:
2 cups fresh corn kernels (about 4 ears)
1 cup chopped seeded tomatoes
1/4 cup chopped roasted bell peppers
2 tablespoons sherry or red wine vinegar
1 tablespoon olive oil
3/4 teaspoon kosher salt
Directions
1. Combine first nine ingredients in a blender and process until smooth, scraping sides and occasionally. Combine steak and marinade into ziplock bag and marinade for 24 hours. Discard bag and marinade.
2. Prepare Grill
3. Place steak on a grill rack coated with cooking spray, and grill for 6 minutes on each side or until desired degree of doneness. Cut steak diagonally across grain into thin slices.
4. To prepare relish, heat a large nonstick skillet over medium high heat; coat pan with cooking spray. Add corn; saute 5 minutes or until lightly browned. Remove from heat; stir in tomato and next 4 ingredients. Serve with steak. Garnish with thyme, if desired.
Serves: 5 (3 oz steak with 1/2 cup relish)
Per Serving: 303 cal, 14.9g fat, 25g prot, 16.5g carb, 2.7g fiber
Points per serving: 7
I think I saw Rachael Ray do this, but for an easy way to cut your corn off the cob without getting corn everywhere, but a small bowl inside a big bowl. Use the small bowl to prop your corn off, and then the big bowl catches it. Cool huh! It will save you from a mess.
Nacho Beef Bake

One of my favorite things about cooking is all the exciting things there are out there to try. New ingredients, new cooking techniques, new experiences. It's so fun, but it's also nice to come back to what's familiar and what you know will be delicious.
That's exactly how I felt when I saw this recipe. With it's flaky crescent roll crust, flavorful taco meat, and melty cheese topping, how could you go wrong? I loved it before I even bought the ingredients for it, and my family loved it too. The best part is that it came from my Healthy edition of Taste of Home, so I didn't have to feel as though this comfort dish was going to make me any less comfortable in the waistline!
Nacho Beef Bake
Slightly Adapted from Taste of Home, Healthy edition May/June edition
Ingredients
1-1/2 pounds lean ground beef
1 can black beans, rinsed and drained
1/2 cup water
1 envelope taco seasoning
2 tubes refrigerated low-fat crescent rolls
1 cup reduced fat sour cream
1 cup shredded reduced fat cheddar cheese
chopped lettuce
chopped cilantro
chopped tomato
chopped avocado
Directions
1. In a large skillet, cook beef over medium heat until meat is no longer pink; drain. Add the beans, water and taco seasoning; mash slightly. Cook and stir for 4-5 minutes or until heated through; set aside.
2. Unroll crescent dough and press onto the bottom and up the sides of a 13x9 inch baking dish coated with cooking spray; seal seams and perforations. Spoon beef mixture over dough. Spread sour cream over beef mixture; sprinkle with cheese.
3. Bake, uncovered, at 375 for 18-22 minutes or until cheese is melted. Top with lettuce, tomato, avocado and cilantro. Serve immediately.
Baked Spaghetti


I just love a baked pasta. It's bubbly, it's gooey, and the noodles have soaked up all that delicious flavor. Ah, it's heaven in a dish!
I don't make spaghetti that much because, even though I really like it, I like to save it as a bake up dish when I've completely run out of food, energy, or creativity. But when I saw this recipe on Mommy's Kitchen, I knew it was time to pull out the beef and noodles! I adapted this recipe a bit, but make sure you check out the original one at Tina's blog too, she's got some awesome stuff!
I made this with my own spaghetti sauce that I posted a long time ago.
Baked Spaghetti
Adapted from Mommy's Kitchen
Ingredients
9 ounces spaghetti, cooked and drained
1 batch spaghetti sauce
2 tablespoons either olive oil or basil oil (basil infused olive oil)
1/4 cup Parmesan cheese
1/2 cup mozzarella cheese
1/2 cup cheddar cheese
Directions
Heat oven at 375. Prepare spaghetti sauce according to directions. Toss noodles with oil and Parmesan cheese. Spray 9x13 pan with cooking spray and arrange noodles in pan. Pour spaghetti sauce evenly over noodles. Sprinkle cheese. Bake for 30-45 minutes, or until cheese is browned and bubbly.
I would also like to send a huge thank you out to Kathy at Three On Food and Katherine at Smoky Mountain Cafe for this adorable award.

These are the guidelines for the award:
1. Thank the person who nominated you for this award.
2. Copy the logo and place it on your blog.
3. Link to the person who nominated you for this award.
4. Name 7 things about yourself that people might find interesting.
5. Nominate 7 Kreativ Bloggers.
6. Post links to the 7 blogs you nominate.
7. Leave a comment on each of the blogs letting them know they have been nominated.
So here it goes:
1. My passion for food is a fairly new one. It wasn't until I was on maternity leave with my second baby that I discovered the Food Network channel. Ina Garten was the first TV chef I watched and I immediately fell in love. Shortly after that I became very excited about trying new things.
2. I've always prided myself on being a very non-picky eater, but to my dismay, I've realized that there are a few things I just can't get myself to like. Goat cheese, tofu (at least when I prepare it), and ricotta being the biggest ones.
3. I'm pretty much always on a diet, which means that when you see me diving headfirst into a plate of cookies, I'm cheating.
4. Standing at 5'0 I've always had the ability to make everyone feel very tall. Luckily, being short has never bothered me.
5. Even though I've been a stay-at-home mom for two years, I still feel like I'm getting the hang of it. Sometimes I wonder if that feeling ever goes away.
6. I am enjoying every minute of living in the east. I don't honestly know how long we'll be out here, but we're having a lot of fun with our new experiences.
7. I can't wait to have my dream kitchen. It may not be for a long time, but I think all the time about how I want to build my kitchen when I get the chance. It gets a bit bigger everytime lol!
And I'd like to pass this on to:
1. Sophia at Burp and Slurp
2. Sara at Sara in the Kitchen
3. Alissa at Spunky Girl Eats
4. Barbara at Barbara Bakes
5. Denise at Keeper Worthy Recipes
6. Reeni at Cinnamon Spice and Everything Nice
7. Aggie at Aggie's Kitchen
I also want to thank Emaline at The Open Pantry for this lovely award:

I'd like to pass this on to:
1. Sarah at Delectable Dining (did I get your name right?)
2. Rachel at Rachel vs Kitchen
3. Itzy at Itzy's Kitchen
4. Judy at Judy's Kitchen
Whew! Congratulations ya'll and keep on cookin!


Creole-Style Potato Wraps

For a few weeks now I have been watching the BSI challenge coming and going feeling a bit too shy/lazy/unequipped to jump in, but when Christo from Chezwhat? chose potatoes for the challenge, I felt like I would be doing my homestate (Idaho) wrong for not joining. Potatoes were a huge part of my diet growing up, and why wouldn't they be? We were surrounded by them, they are cheap, delicious and versatile. I love potatoes!
My food loving hubby and I had a lot of fun thinking this one up. I'm not entirely familiar with Cajun style food, but we do have a bottle of Creole seasoning, so we went with it. My biggest piece of advice for you when you make it, make sure you use the biggest and sturdiest flour tortillas you can get. I made the mistake of using small, lowfat ones, and ended up having to just stack another tortilla on top and making "wedges" instead of wraps. It tasted just as good, but I think it still would have been a bit easier to eat had it been pressed as a wrap. I loved the mildness of the potato with all the bold spicy flavors of the Cajun seasoning and andouille sausage, and the tomatoes and mushrooms added a nice cool balance. This was so much fun to create with my husband and definitely something that we will be making again!
Creole-Style Potato Wraps
Ingredients (for 1)
1/2-1 baked potato, thinly sliced
1 teaspoon creole seasoning
1 tomato, thinly sliced
1/4 cup ground andouille sausage, casing removed (Costco has a great chicken andouille sausage) 1 green onion, sliced
1/4 cup mushrooms sliced
1/4 cup sharp cheddar cheese, grated
1 large flour tortilla
Directions
Sprinkle each potato slice with creole seasoning, both sides. Heat large skillet with olive oil and saute potatoes until each side is browned. Set aside. In same skillet, saute sausage, green onion and mushrooms until mushrooms and soft and onions are slightly wilted. Lay tortilla on plate. Arrange potatoes down the center, then lay tomatoes on top.


The top with sausage mixture and cheese.
 (Can you see the ridiculousness of my small tortillas? I ended up just spreading the ingredients out, adding more potatoes and tomatoes, and placing another tortilla on top. Luckily the cheese held it all together nicely.)
Fold the outside sides of tortilla into the center and lay gently onto panini press, or pressed into a skillet with a weight on top. Be sure both sides are pressed evenly until tortilla is nice and browned and the cheese is melted. I'm not exactly sure is sour cream is part of Cajun eating, but it would be a delicious way to top these bad boys all the same! Here you go Christo, thanks for choosing such a great ingredient!
Strawberry-Shortcake Cookies

Of all the baked goods out there, I'm pretty sure that cookies have always been my favorite. They are so dense with rich concentrated flavor that I can never seem to get enough of. I love cookies of all kind, and I don't know if I will ever be able to proclaim any cookie as being my favorite cookie. However, if I HAD to choose a favorite, there is a very good chance that these cookies would come to mind very quickly. I found these on Elizabeth's blog at Elizabeth's Edible Experience. She is always impressing me with her delicious recipes, and takes fantastic pictures, go check her out!
Oh my goodness, how I loved these cookies. I don't think I'll be able to make them often because these are they type of cookies that you want to make a meal of. They are so flaky and light, with a sweet strawberry taste and and are so visually appealing. Elizabeth suggests that you make them the day that you plan to eat them because they are a bit mushy the next day. So instead of baking the whole batch, we baked half of it one day, and then the other half the next day, and the dough itself seems to hold up pretty well overnight. I LOVE these cookies!
Strawberry-Shortcake Cookies
Courtesy of Elizabeth's Edible Experience
Ingredients
12 ounces strawberries, hulled and cut into 1/4-inch dice (2 cups)
1 teaspoon fresh lemon juice
1/2 cup plus 1 tablespoon granulated sugar
2 cups all-purpose flour
2 teaspoons baking powder
1/2 teaspoon coarse salt
3 ounces (6 tablespoons) cold unsalted butter, cut into small pieces
2/3 cup heavy cream
sanding sugar, for sprinkling
Directions
1. Preheat oven to 375 degrees. Combine strawberries, lemon juice, and 2 tablespoons granulated sugar. Whisk together flour, baking powder, salt and remaining 7 tablespoons granulated sugar in a large bowl. Cut in the the butter with a pastry cutter, or rub in with your fingers, until mixture resembles coarse crumbs. Stir in cream until dough start to come together, then stir in strawberry mixture.
2. Using a 1 1/2 inch ice cream scoop or a tablespoon, drop dough onto baking sheets lined with parchment (definitely use the parchment paper or a silpat, otherwise they're going to stick like crazy), spacing evenly apart. Sprinkle with sanding sugar,and bake until golden brown, 24 to 25 minutes. Transfer to a wire rack, and let cool.
Sponsored
